Showing posts with label sugar cookies. Show all posts

Wednesday, January 8, 2014

Happy New Year!!

Although this post is a week or so late, I still want to wish everyone a Happy New Year!  As everyone begins to get back into the grind I have found myself in a bit of a baking slump.  I have a million and one new ideas to create and share but just don't know where to begin. We have Chinese New Years approaching on January 31, the Year of the Horse and soon following will be Valentine's on the 14th of February.  

To get myself back into the swing of things I decided to work on a few cookie decorating techniques that I'm not all that comfortable with but would like to master or have never even tried at all.  

First up:
Cross-stitch Patterns (or lace) - is a bit of a tricky technique, as you need to have the right consistency royal icing, a steady hand, lots of patience and you better know your numbers! This was my first attempt at cross-stitch and definately won't be my last.  The icing wasn't as elastic as it should be, but I'm sure that can be solved by adding some piping gel to the royal icing beforehand.  As for my wobbly lines...that is gonna have to be a work in progress.  If you want to see a pro cookie decorator do this, try watching this video by Haniela who is not only an awesome cookie artist, but she does most of her work with just a regular grocery store zip-seal bag! 
Cross-stitch Technique
Second up:
Royal Icing Transfers - I love the way this turned out; no pun intended.  I have always wanted to purchase a Kopykake projector but with the price being a bit steep for a hobby decorator such as myself, royal icing transfers are the way to go.  My first attempt a couple of months back didn't end well and I never tried again. No beginnings though, right?  

I started off by printing a template of the famous pop art "Love" logo in numerous sizes.  Once printed, I slipped the paper into a sanitized sheet protector, and basically traced the logo with a 1.5 PME tip and 10-second royal icing.  When dry, these can be applied to wet royal icing, fondant, *buttercream etc.  For those worried that the sheet protector isn't FDA approved, you could use parchment paper, wax paper or even an acetate sheet.  I find parchment ripples from the moisture, wax is a bit too difficult to see through and the acetate isn't readily available.  I've read that sheet protectors are safe to use, so I went ahead and tried.  

This technique can be done with various images or logos or even free-hand if you like.  It is a great way to add dimension to a cake or cookie.  Once piped, let these dry completely before handling.  Also, they are quite delicate so handle with caution.  These transfers can be stored in an air-tight container for future use.  I made quite a few of these and will be using them on future Valentine's Day cookies.  Keep an eye out for that soon!

*buttercream - the fats in the buttercream will start to dissolve the transfer after a few hours, so serve your guests immediately if using, or apply to surface right before serving. 
Royal Icing Transfer


Third Up:
Silicone Molds - Fondant decorations don't necessarily have to be used with cakes or cupcakes, but can be used on cookies too.  I recently ordered a few handmade, food-grade, silicone molds from Christine's Molds, hoping to broaden my decorating skills.  These molds can be used with fondant, chocolate, gumpaste, or even clay for the crafty person.  

If using fondant, be sure to dust the mold with cornstarch, brushing away any excess to prep the mold. Knead your fondant until soft and pliable, roll into a ball and press firmly into the mold, making sure to push into all nooks and crannies.  Using a cornstarch dusted fondant roller, roll over top to ensure there are no gaps between the fondant and the mold.  Trim any excess fondant, so the fondant is flush with the mold and you have a smooth, even surface. Place in the freezer for five or so minutes to firm up.  Once firm enough to handle, flip the mold over so the fondant is facing your clean surface, and slowly roll the silicone mold back. The fondant piece should pop out without any problems.  Let air dry completely before painting or airbrushing.  


Fondant Decoration using Silicone Mold
Lastly:
Royal Icing Stencils - These are my favourite of the bunch.  It is so simple, anyone can do it. All you need are a few pre-iced cookies (royal icing base should be completely dry before attempting this), stencils of your choice (I got mine here), piping consistency royal icing, and an offset spatula.  Arrange the stencil how you would like it to appear, scoop a generous amount of royal icing onto the back of the spatula and carefully spread over the stencil. Wipe off any excess icing from your spatula onto the side of a bowl or clean towel, and wipe the stencil once more, leaving behind a thin, even film.  Slowly lift the stencil from one corner, making sure not to smudge the still-wet icing.  Let dry.  You can now paint the stenciled icing, or leave as is.  


Royal Icing Stencil 


Tomorrow is another day for cookie experimenting.  Next week will be frosting recipes.  I've got my tastebuds set on some chocolate chip cookie dough frosting, as well as some chai vanilla bean frosting.

Happy Baking!

Wednesday, December 11, 2013

Holiday Cookie Gift Ideas Part 2

When I think of winter I always think of trees glistening with fresh snow, and everything that was once dark and dreary is now sparkling in the light.  I decided to make these Christmas tree ornaments, flooded in various pastel shades and airbrushed in silver or pearl.  The results are below:


After decorating these cookies I heat-sealed them for freshness and packaged them in pie boxes with a clear window as gifts for my son's teachers and the school staff.  They were a big hit!  I particularly like the pastel shades on a light coloured cookie, thus this is a vanilla lemon sugar cookie.

Below is a chocolate sugar cookie, decorated with classic colours and dusted with a bit of gold pearl for some brightness:

You don't have to have holiday cookie cutters to make holiday-themed cookies.  Anything works, including this cupcake cutter!  Happy Baking!

Wednesday, November 27, 2013

A New Beginnining

Well I don't know where to begin really, but if you are reading this, Welcome!  My name is Andrea and I enjoy baking.  Actually, obsessed would be the correct word.  I enjoy reading about baking, watching videos about baking, searching high and low for the best ingredients and supplies and of course the actual baking and decorating process itself.  I recently found that I love to craft as well.  This blog will mainly focus on baking with a few crafty things here and there.  I've been wanting to start a blog for years now, to not only journal my creations but to maybe help inspire others with new ideas.  So let's begin!

Let me take you through a few goodies I've made over the past two months shall we?

Brush Embroidered Sugar Cookie with Pearl Dust
Above was my first attempt at using the brushed embroidered technique.  It wasn't the best but not bad for a first try.  I can't tell you how many times I have watched Amber showing the technique in her video and wanting to one day try it for myself.  If you aren't familiar with Amber, she is an amazing cookie artist and her designs are just breathtaking.  For those cookies I used a flood consistency icing (15 seconds) to flood the cookie and allowing it to dry overnight, before using stiff consistency icing for the embroidery.  I used a damp, square-tipped brush to drag the icing inward, creating a feathered effect.  I then piped a bead border and allowed everything to dry a few hours before painting the embroidered leaf with pearl dust (a mix of alcohol and pearl dust) and dry dusting the pearl dust on the floral embroidery (grey cookie).  This truly was a labour of love.


These mini gingerbread houses were so much fun!  I made them for my younger son's class and my husband joked that maybe next year I would actually let the kids build the houses. Riiiight....  I'm not a control freak.  Really, I'm not.  =)  While I'd love to say that I painstakingly hand-cut all of those little house pieces, I did not.  I came across a very cool 3D cookie cutter by GoodCook that cuts all the pieces to make one house in just one press.  The recipe I used does not spread whatsoever, but does puff slightly, however, these cookies came out perfect and I was able to fit them all together without having to shave down any uneven bits.  I highly recommend this cutter if you plan on making, say, a few dozen mini houses!

Dark Chocolate Cupcake with Vanilla Swiss Meringue Buttercream
This cupcake....oh how I loved the way this cupcake turned out.  It was my children's school's 50th Anniversary and I was asked to make cupcakes.  I wanted to create something simple but elegant, after-all it is a 50th Anniversary.  The swiss meringue buttercream was lightly sweetened and topped off with a milk chocolate star, dry brushed with gold pearl dust and a few gold dragees.

Crafts---I wasn't always good at crafts.  In fact, I downright used to suck at crafts.  I loved watching Martha Stewart since I was a young teen, and I would try my best to re-create or interpret ideas she had but all were a fail.  A lot had to do with inexperience but most was due to being impatient.  I hated waiting for paint to dry, or for glue to set.  Nope, when I want something done, I want it done right and I want it done NOW. Well, that didn't work out so well.  A few years and a dozen or so failed attempts later, I've learned to slow down and just enjoy the process.  So here are a couple of successes:

Hand-cut Bats


Halloween Sweet Table
See that ugly dome-shaped hollow in my hallway wall?  My dad put that there when he built the house.  He loves it.  I hate it.  I needed a way to make that eye-sore of a wall feature not so fugly.  I had seen a photo on Pintrest showing paper bats adhered across a living room wall, as if they were flying off into the distance and figured I could do something similar.  Those damn bats...I printed templates off the internet and actually traced each and hand-cut each and every single one of those bad-boys.  I know you're thinking, "well 18 isn't that many?" but what you don't see are the other 30 extending down the rest of the hallway to the kitchen.  
The sweet table was my first and definately not my last.  My younger son's birthday falls on the 30th, the day before Halloween and he wanted a Halloween-themed party this year.  So I had a vision in my head and was actually able to execute it!  My favourite part?  Drumroll please.....
Pinata Cake
I made my first pinata cake!  Not only that, but a rainbow cake!  It wasn't a perfect cake, but it sure did impress my little one, and the rest of the family too.  Hell, it impressed me!  I usually critique every single minute detail but I let this one slide.  I didn't mind the bumpy sides, or the fact that I knew the weight would be an issue and settling would occur.  I didn't mind the fact that the royal icing eyeballs weren't even nor the fact that the colours were more pastel than rainbow-y.  Normally at this point I would've tossed the cake and started fresh.  What I did love was seeing my son's eyes light up as the skittles poured out from within.  He was absolutely amazed (not gonna lie, so was I).  
I'm gonna end this post with two more crafty things, both of which were made from dollar store finds and not too shabby  in appearance if I do say so:

Dollar Store Crafts
I put together the winter wonderland-inspired wreath with hot glue and a dollar wreath, snowflakes, rhinestones, and flowers.  Total cost?  $5 plus tax.  The garland are made from silver wrapping twine, scrapbook paper and of course hot glue.  Total cost?  $4 plus tax and I still have the remaining 30 sheets of scrapbook paper, another 10 snowflakes and twine if I decide to make more.  The blue and silver stars were from a local grocery store, found in their party section.  It matched the colour theme so I figured what the hell.


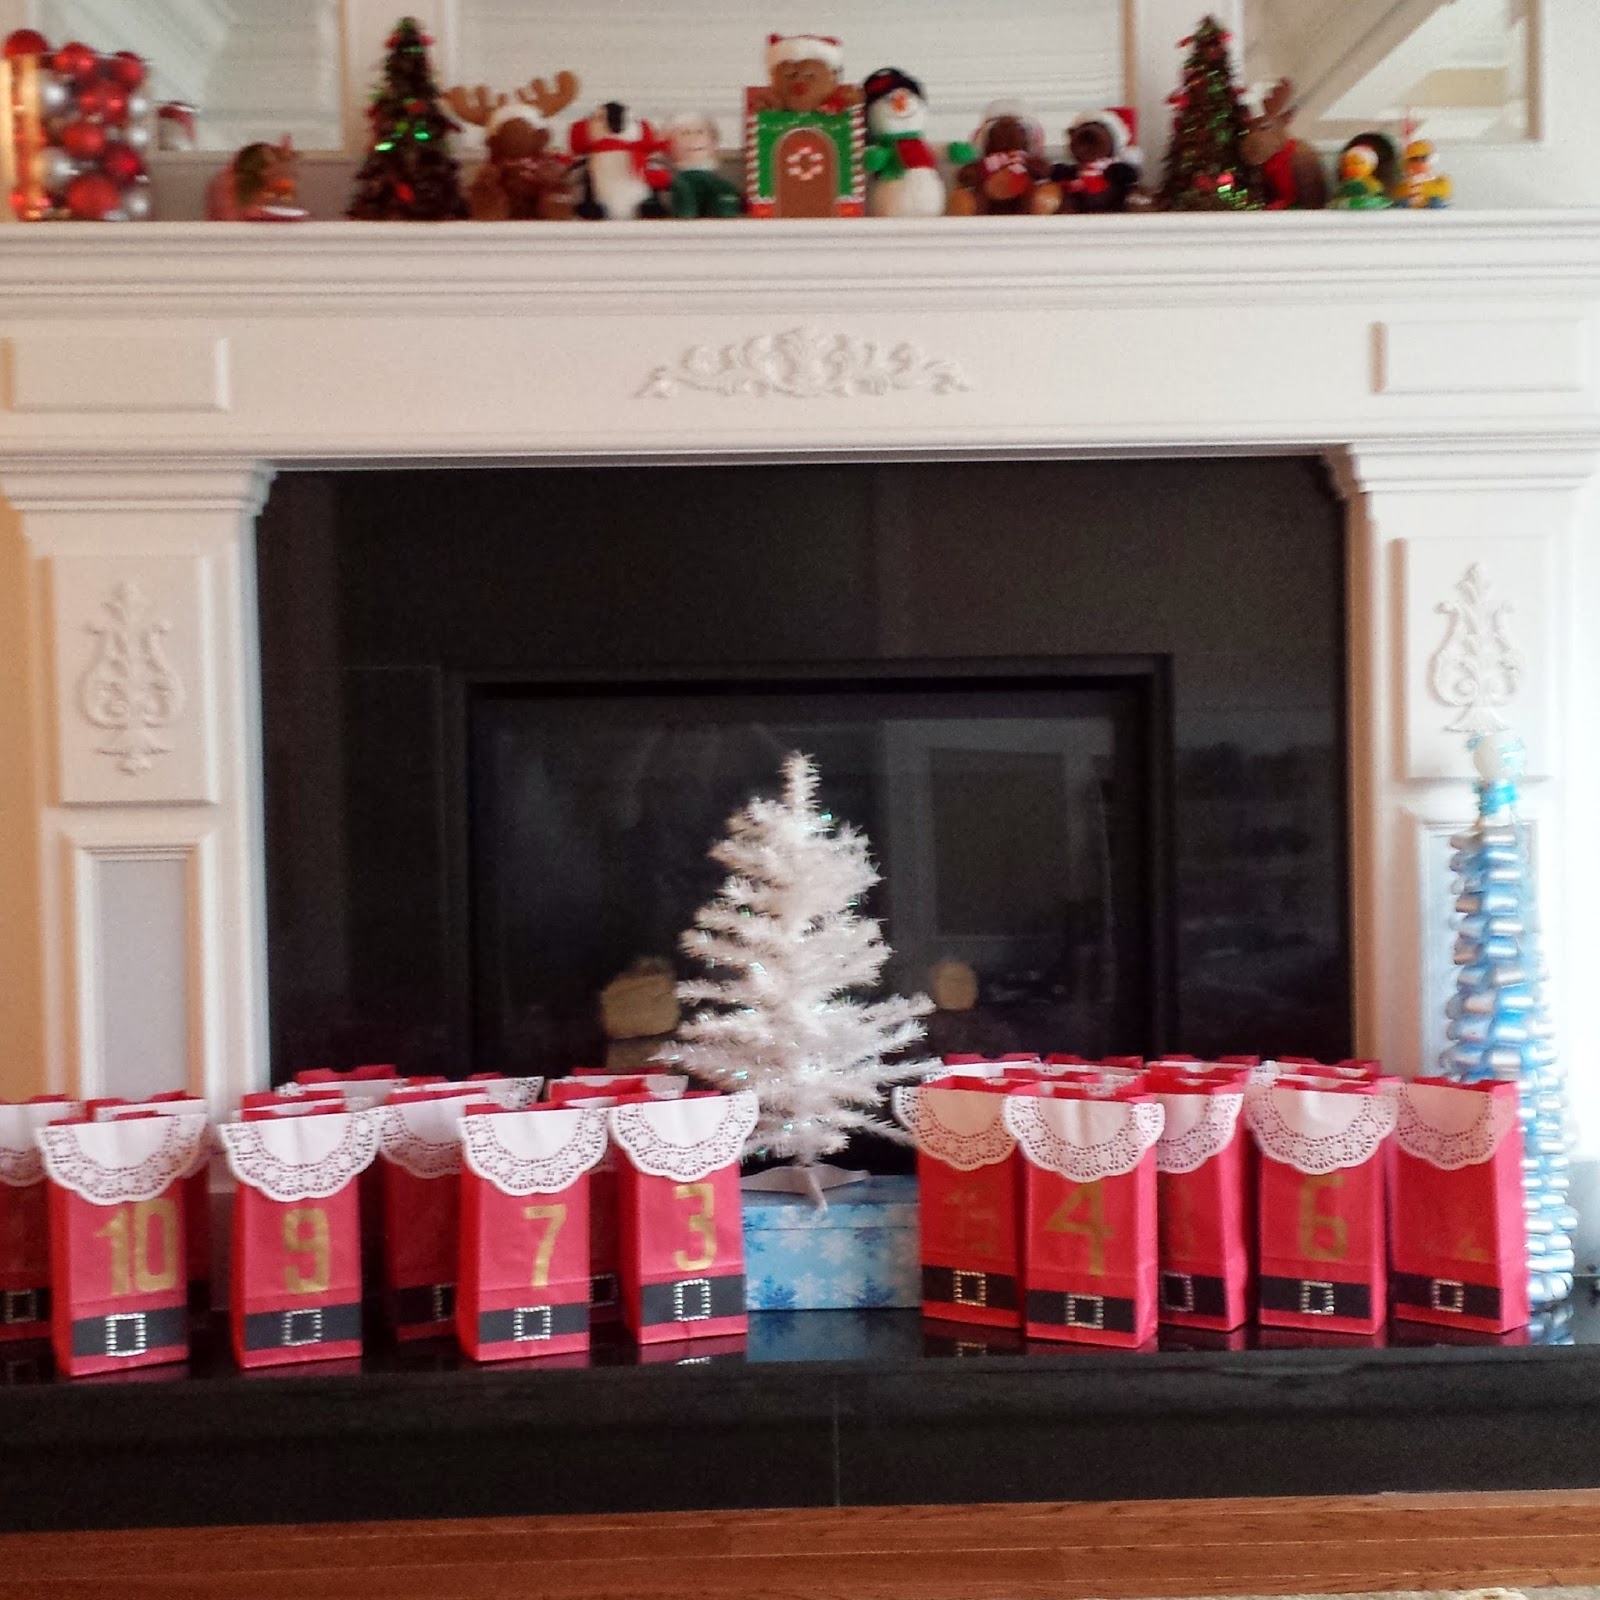
DIY Advent Calendar
I am so happy with the completed project above.  I had wanted to make my sons an advent calendar, but seeing that it was the beginning of November I knew I was a bit late in the game.  I found these paper bags in the household/grocery section at Target and bought em, not knowing what the heck I was gonna do with them.  After searching on Pintrest for DIY advent calendars I came across paper bag ones but they weren't exactly "right."  After looking at what I had in my crafting bin I decided to turn those little red bags into Santa's belly!  Paper doilies, scrapbooking glue, red paper sacks, gold sharpie, scrapbook paper and the left over rhinestones from the wreath project--total cost?  $6 plus tax and I still have leftovers.  The tough part? Coming up with creative items to put inside the bags!  Some ideas were for a family movie night, a night of ice skating, going tubing at Mount Seymour etc.  

Well, I hope you enjoyed my very first  and VERY LENGTHY post.  Be back soon with new goodies to share!